Welcome to the Machine — Part II: Hearing the Visible Bandmates
How we stopped leaving our stage sound to chance
Part II of my Welcome to the Machine series describes the evolution of our band’s monitoring system, from unpredictable noise to repeatable individual mixes.
In the world of live music, certainly at the level of gigs we are involved with, few things are quite as unpredictable and changeable as on stage sound. In the rehearsal room, things can be controlled to a degree but even then, it’s a loud environment which seems to sound different every week. Rehearsal room PA systems are often basic vocal models which are fine for vocals but when you need to put instrumentation through them, they fall short of the mark. For this reason, when Dawn of Elysium first started using a backing track, I bought a more substantial PA, consisting of a Yamaha MG166CX desk and two EV ELX112 active speakers. Our rehearsal room at the time was quite long and whilst we were recording our first album, it became evident quite quickly that we’d need some kind of monitoring. I bought a Wharfedale EVP-X12PM active monitor wedge. This made for a substantial rehearsal room PA as it was, only to be further bolstered by my getting a second monitor wedge shortly after. I even toyed with the idea of getting matching subs but couldn’t justify the cost, especially since the PA system doesn’t get as much use these days (from our band anyway).
Still, it’s all well and good having horsepower but when it has to compete with loud guitar amps, feedback is a problem. We probably didn’t have the room optimally configured at the time either. Anyway, unpredictability aside, the PA served us well for years. When Gordon joined the band, I sent him a separate monitor mix for his in-ears and I ran a click from the backing track machine, both of which were handled by a Mackie Mix8 submixer. Nige brought with him a third Wharfedale wedge so local monitoring for each musician was possible, albeit only serviced by two foldback mixes, one for Gordon and one for the rest of us. I’d like to say it worked well (which in the main it did for me) but I was forever being asked to alter levels each rehearsal which was distracting.
During 2024 and 2025 we assembled our old band Dawnraiser for a nice trip down memory lane and during this time, we got together at a different studio to rehearse some songs. The PA and monitoring weren’t as critical for this project because the only thing which needed to be amplified through a PA was my vocals. However, we decided to record what we did. Ian, our bassist, has a Zoom R16 which we used to great effect, although it could only record eight tracks simultaneously. My portastudio, the Tascam DP-32, offered plenty of track capacity but had the same eight-input recording limit. It was the recording limitation that first sent me looking for a more capable machine, but what I eventually found also offered a way to solve Dawn of Elysium’s monitoring problems.
I discovered the Allen & Heath CQ18T digital mixer, which not only answered the recording problem but could also improve the monitoring situation for Dawn of Elysium. It’s not so much a recording machine as a digital mixer that happens to be able to record. It records with great quality but its functionality in that area is very rudimentary, which is fine for completely live recording since I can edit and mix in Logic afterwards. However the unit has six individual monitor outputs each of which can be mixed independently using a mobile app called CQ4You. That way each band member immediately becomes responsible for their own monitor mix (hence eliminating the need for me to get hassled so much – at least that was the theory!)
And so the CQ18T became the heart of our rehearsal setup, although getting a small, loud and fairly chaotic room under control still took some doing.
Since Gordon joined the band, he repeatedly told me that we should all use in-ear monitors and try and construct a repeatable monitor solution, so we wouldn’t be at the mercy of the sound engineer or stage limitations. I have to admit, I resisted for a long time, mainly because I have memories of earphones giving me earache in the past. I also had a fair idea of the cost and complexity involved in building a system capable of delivering what we needed. It was quite a prospect. The rest of the band were in agreement with Gordon. Anyway, after further issues both in a live setting and in the rehearsal room, the protestations of the rest of the band became hard to put off or even argue against, so I capitulated and agreed to give it a go and build the project. The thing with something like this is that you have to bite the bullet and go all in for it to work properly. There’s really no halfway house.
The principle behind the system itself is that all stage signals are fed into it and then split in two. One local split feeds the monitoring system, while an isolated split is passed on to the front-of-house PA.
Since I’d already got the CQ18T, the expensive bit was out of the way. I just needed to design and build outwards from that.
It was obviously going to be some type of portable rack system.
The first task was establishing the monitors themselves. Gordon already had a pair of Shure SE315 wired IEMs, while Nige owned a Shure wireless IEM system already. He’d used it for gigs with very mixed results due to being at the mercy of the sound engineer and also competing with onstage monitors. I did a bit of reading and eventually went for the Sennheiser XSW IEM system. I know and trust Sennheiser gear and already use both their headphones and one of their microphones. I wanted my IEMs to be stereo so we got two base units, which conveniently fit into 1U of rack space. Before I even got the system and tried it, I decided that the stock IE-4 in-ear headphones didn’t really look substantial enough, so I got the IE 100 Pro set. Emma decided to upgrade hers to the Linsoul KZ ZS10 Pro.
That was the monitor outputs sorted anyway. Next the inputs needed to be considered and this gives rise to three main questions:
- How many channels are required?
- Which signal sources shall be fed into the system and what signal type is each?
- Which of these signals are to be fed to the FOH?
For drums, Gordon had already purchased the Yamaha EAD10 which works remarkably well, so only two channels on the desk are required for drum monitoring. Since the FOH engineer will be miking up the kit anyway, the EAD10 is only required locally and need not be split off. These are unbalanced TS outputs so it’s preferable that these be sent through a DI box.
As covered in part I of this series, we’re using four outputs from the Idoru P-1, two of which (Backing L + R) need to be split to FOH. The third one is a mono version of the backing in case we ever need to resort to using only one channel for it (some engineers complain of running out of channels). The fourth output is the click track. This must only ever be monitored locally and never split off to FOH. The P-1 provides balanced, line-level TRS outputs, although they are not transformer-isolated. It’s preferable that these be sent through a DI box.
Three channels are required for vocals, myself being lead vocal and Nige and Emma both backing vocals. These need to be split both locally and to FOH. They are microphone level XLR outputs.
Three channels are required for two guitars and one bass guitar. For the guitars, I used two H&K Red Box 5 units which tap off the signal from the back of the guitar amps and put them through a cab simulator type analogue filter and a DI transformer. The bass guitar signal is taken from the DI output of the Trace Elliot Elf amplifier. These need to be split locally and to FOH (many engineers mic the amps up anyway so might not bother but at least it gives the option). These will be microphone level XLR outputs.
Channel Summary
| Source | Channels | Local monitor | FOH split | Signal type |
|---|---|---|---|---|
| Yamaha EAD10 | 2 | Yes | No | Unbalanced line |
| Idoru P-1 backing L + R | 2 | Yes | Yes | Balanced line |
| Idoru P-1 mono fallback | 1 | Yes | Alternative | Balanced line |
| Idoru P-1 click | 1 | Yes | No | Balanced line |
| Vocals | 3 | Yes | Yes | Mic-level XLR |
| Guitars and bass | 3 | Yes | Yes | DI / mic-level XLR |
This showed:
- 12 channels in total
- eight channels requiring a local and FOH split
- six channels requiring DI conversion
The first thing we required, then, was an eight-channel XLR splitter with transformer-isolated outputs. The direct outputs would feed our local monitoring system, while the isolated outputs would be passed to front of house. This keeps the two systems electrically separated, prevents phantom power from travelling across the isolated split and helps protect against ground-potential differences between different parts of the venue — something we had come a cropper with in the past.
I also wanted a unit without permanently attached trailing leads so that the rack could be packed away neatly and connections could be replaced or serviced easily if required.
After much research, I discovered that the Behringer MS8000 was probably one of the more popular units for this application. I am always a little apprehensive about Behringer gear, as some of it tends to sit towards the less substantially made end of the market. However, the price difference between this and many of the alternatives was significant and difficult to argue with. Various reviews and testimonials from friends put my mind at ease, so I decided to go for it. Upon receipt, it actually seemed reassuringly sturdy and well made.
Similarly, I wanted an eight-channel rackmount DI unit, and the Behringer DI800 appeared to tick all the boxes. One important footnote is that, although it performs the required level and impedance conversion and provides balanced XLR outputs, it is an active electronic design rather than a transformer-isolated DI.
In this system, however, the transformer isolation is provided later by the MS8000 on the signals being passed to front of house. The DI800 is therefore primarily responsible for preparing and balancing the EAD10 and P-1 signals before they enter the monitoring system and splitter.
The next obvious choice was to pick a rackmount case in which to house the project. I decided that I didn’t want to mount the CQ18T permanently in the rack, since I wouldn’t always be using it solely for this application, so a reasonably compact 4U case seemed a good fit. After some deliberation, I decided upon the Gator GR-4S.
I also didn’t want cables disappearing untidily into the back of the rack. I wanted the main connections to be accessible from the rack faces, so I installed a 12-way XLR patch panel at the front for the DI800 outputs and XSW IEM inputs. A second panel at the rear provides access to the local outputs from the MS8000.
I’d seen bands using similar stageboxes for IEM systems before, and one thing that always stood out was the sheer number of XLR cables involved. I really didn’t fancy patching 16 separate leads every time we set the system up, and long conventional looms are cumbersome to transport and manage. I therefore decided to carry the analogue audio over Cat cable instead.
This isn’t a digital network system such as Dante. The Cat cable is simply being used as a compact analogue multicore, with each of its four twisted pairs carrying one balanced audio channel. Thomann sell a range of passive breakout units under the sssnake Cat Snake name, allowing four XLR connections to be carried over a single shielded Cat cable without any conversion, processing or network configuration.
For the eight isolated outputs going to front of house, I used two sssnake Cat Snake 3FC tails at the rack end. Each one connects four female XLR plugs to a single Cat socket, so together they take all eight isolated outputs from the MS8000 and place them onto two Cat cables.
At the front-of-house end, two matching sssnake Cat Snake 3MC tails break those signals back out into eight conventional male XLR connectors, ready to plug into the venue’s stagebox or mixing desk. This replaced eight long XLR runs with two much lighter and easier-to-manage Cat cables.
A separate, unmodified sssnake Cat Snake 3FB stagebox sits at the front of the stage for the vocal microphones. Three of its four female XLR inputs carry my lead vocal and Nige and Emma’s backing vocals back to the rack over a single Cat cable, while the fourth channel remains available as a spare input. At the rack end, the corresponding 3MC male XLR tail connects those channels to the monitoring and splitter system in the usual way. Because every signal on this loom travels in the same direction, no connector modifications were required.
The backline connections needed a slightly different arrangement. Three channels had to travel from the musicians towards the rack: Nige’s guitar signal, my guitar signal and Emma’s bass DI. The fourth channel needed to be used as a return, carrying Nige’s monitor mix from the CQ18T back to his Shure IEM transmitter.
For this I used another Cat Snake 3FB stagebox with its matching 3MC tail. In its standard form, all four connectors on the stagebox are female XLR inputs and all four connectors on the tail are male XLR outputs. That arrangement was correct for the three instrument signals but not for the monitor return, so I modified channel four at both ends.
On the stagebox, I replaced the fourth female XLR socket with a male panel connector, turning it into an output for Nige’s monitor feed. At the rack end, I replaced the corresponding male XLR plug on the tail with a female connector, allowing it to connect to the relevant CQ18T monitor output.
The wiring itself remained pin-for-pin, so the Cat Snake system was electrically unchanged. I had simply reversed the connector gender at each end of channel four so that it could be used as a return rather than an input. Channels one to three therefore operate as normal stage inputs feeding the rack, while channel four carries Nige’s monitor mix back towards the stage.
I labelled the modified channel clearly as Nige IEM Return — CQ Out Only to avoid anybody mistaking it for another microphone input. The finished arrangement gave us three backline feeds and one monitor return over a single Cat cable, while the separate two-cable loom carried all eight isolated outputs to front of house.
I also wanted some local power management, so decided to add a switched IEC distribution strip at the rear of the rack. This meant that the CQ18T, IEM transmitters and DI unit could all be powered from a single mains connection, with each device switched individually if required. Keeping the sockets accessible from the rear also made setup straightforward while containing most of the power cabling within the rack.
With all the individual parts selected and the routing worked out, the complete system finally looked like this:
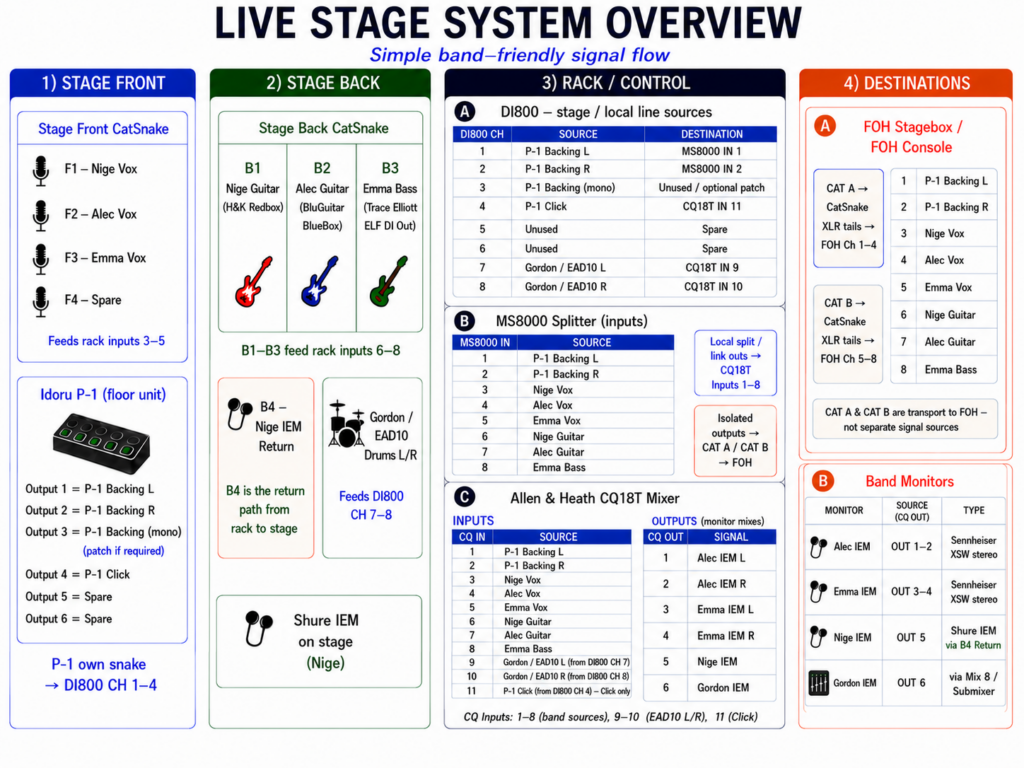
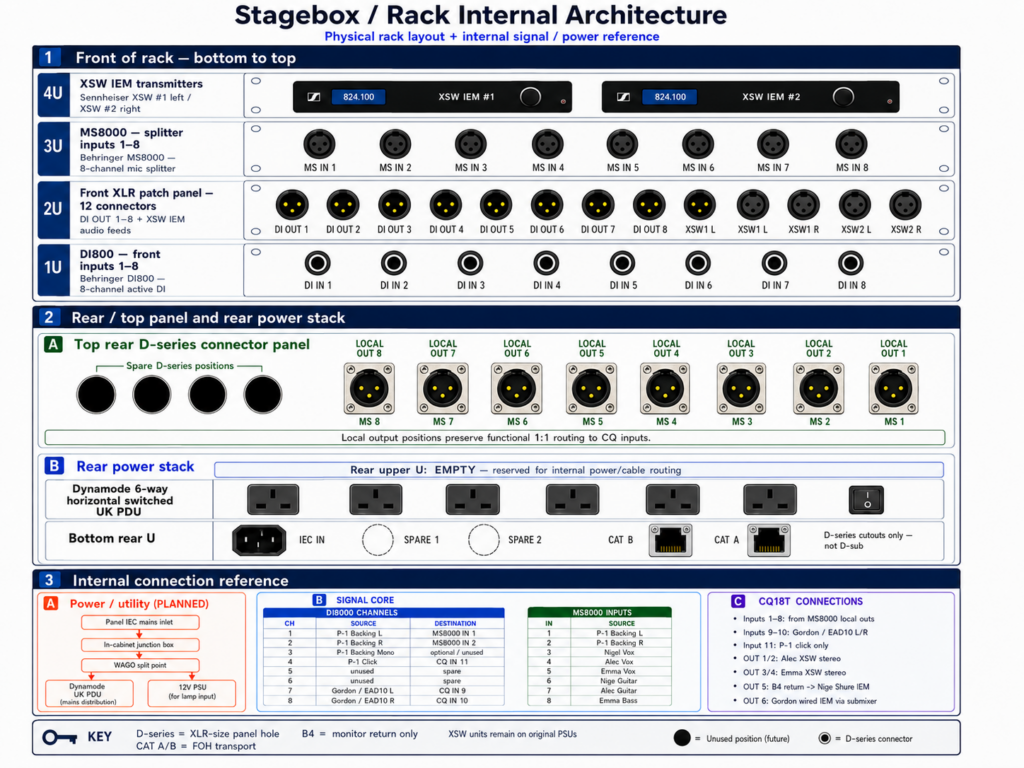
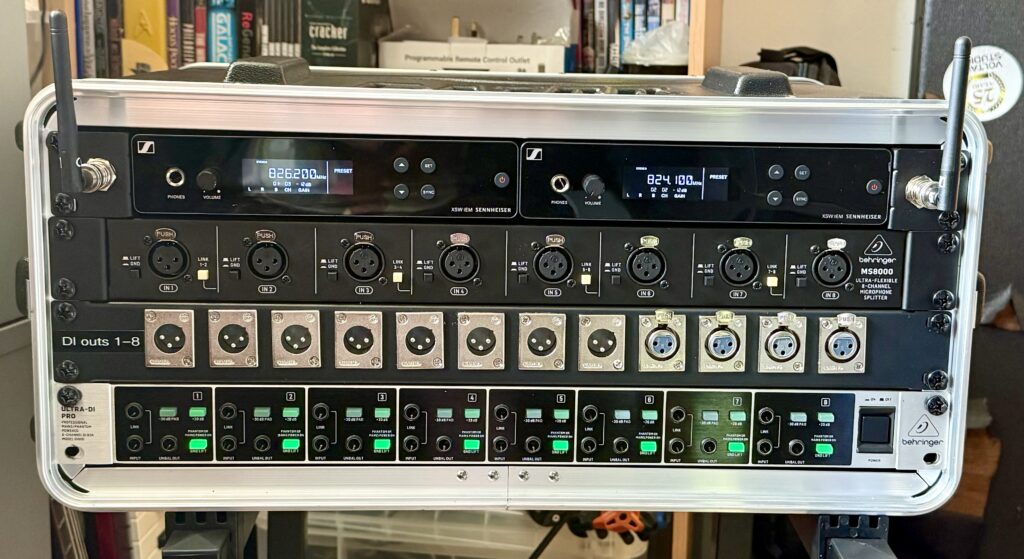
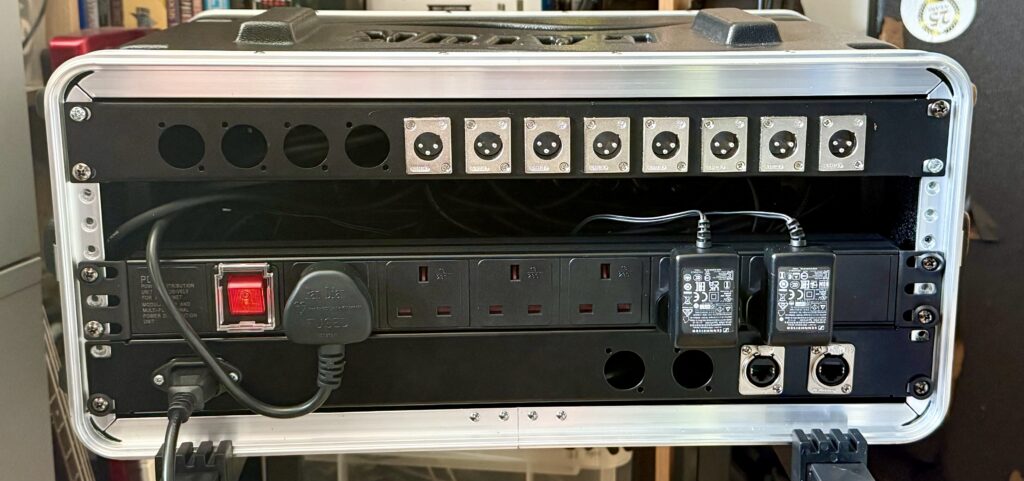
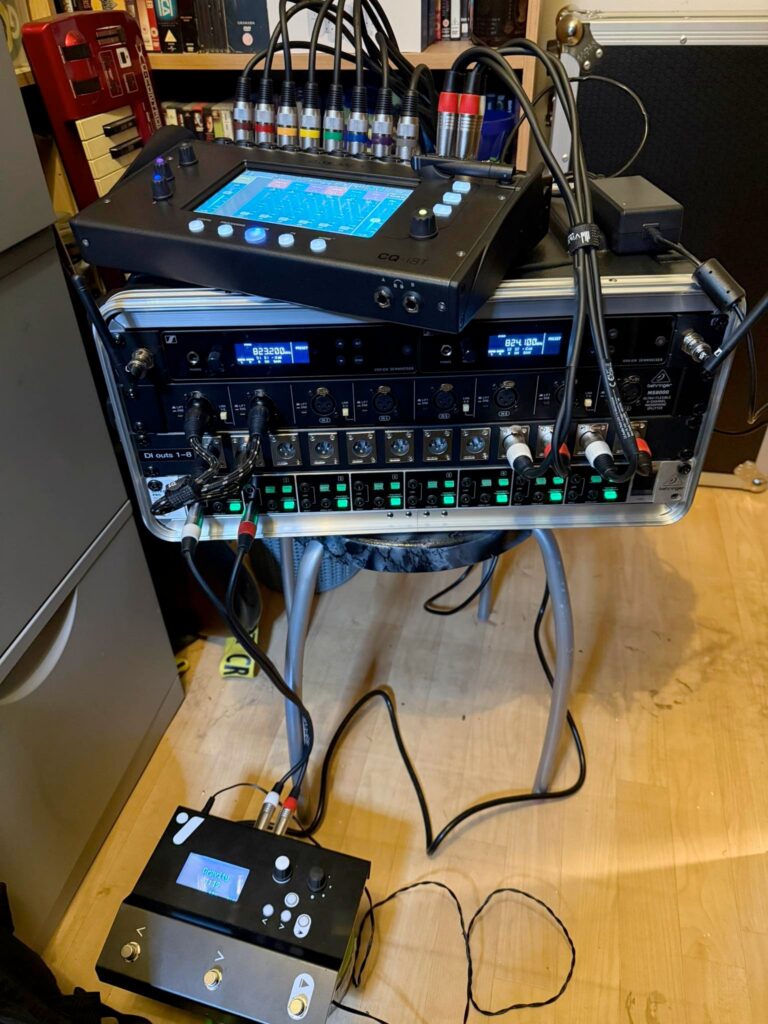
One thing that only became obvious when I tested the system in a live setting was how difficult it was to see the rear connections during setup. Venues are rarely well lit around the stage, and trying to identify sockets and patch cables in the dark quickly became the most awkward part of the process. For that reason, I decided that the rack needed its own local light. The plan is to use one of the four spare positions on the top rear panel for a BNC socket, allowing a small gooseneck lamp to be plugged in when required.
The intended upgraded power arrangement is shown in the architecture diagram. The existing IEC inlet currently feeds the rear-mounted mains distribution strip; the plan is to add a small internal junction box and Wago distribution point so that it can also supply a separate 12 V power supply for the lamp. This will give the lamp its own low-voltage supply while still allowing the whole rack to run from one external mains connection. At the time of writing, the internal distribution, BNC socket, lamp and 12 V supply have not yet been fitted, so this part of the diagram represents the next planned upgrade rather than the system as it currently stands.
On paper it looks fairly involved, but most of that complexity only had to be worked out once. In use, the aim is much simpler: a repeatable setup, fewer long cable runs and a monitor mix that each band member can control for themselves. What started as an attempt to make rehearsals and gigs less unpredictable had finally become a complete system of its own.
Discover more from Outpost 10
Subscribe to get the latest posts sent to your email.